0%

Guide

install

1
sudo apt-get install libeigen3-dev

install to /usr/include/eigen3/ and /usr/lib/cmake/eigen3

1
ll /usr/lib/cmake/eigen3

Eigen3Config.cmake

1
2
3
4
5
6
7
8
9
10
11
12
13
14
15
16
17
18
19
20
21
22
23
24
25
26
27
28
#                                               -*- cmake -*-
#
# Eigen3Config.cmake(.in)

# Use the following variables to compile and link against Eigen:
# EIGEN3_FOUND - True if Eigen was found on your system
# EIGEN3_USE_FILE - The file making Eigen usable
# EIGEN3_DEFINITIONS - Definitions needed to build with Eigen
# EIGEN3_INCLUDE_DIR - Directory where signature_of_eigen3_matrix_library can be found
# EIGEN3_INCLUDE_DIRS - List of directories of Eigen and it's dependencies
# EIGEN3_ROOT_DIR - The base directory of Eigen
# EIGEN3_VERSION_STRING - A human-readable string containing the version
# EIGEN3_VERSION_MAJOR - The major version of Eigen
# EIGEN3_VERSION_MINOR - The minor version of Eigen
# EIGEN3_VERSION_PATCH - The patch version of Eigen

set ( EIGEN3_FOUND 1 )
set ( EIGEN3_USE_FILE "${CMAKE_CURRENT_LIST_DIR}/UseEigen3.cmake" )

set ( EIGEN3_DEFINITIONS "" )
set ( EIGEN3_INCLUDE_DIR "/usr/include/eigen3" )
set ( EIGEN3_INCLUDE_DIRS "/usr/include/eigen3" )
set ( EIGEN3_ROOT_DIR "/usr" )

set ( EIGEN3_VERSION_STRING "3.2.92" )
set ( EIGEN3_VERSION_MAJOR "3" )
set ( EIGEN3_VERSION_MINOR "2" )
set ( EIGEN3_VERSION_PATCH "92" )

UseEigen3.cmake

1
2
3
4
5
6
# -*- cmake -*-
#
# UseEigen3.cmake

add_definitions ( ${EIGEN3_DEFINITIONS} )
include_directories ( ${EIGEN3_INCLUDE_DIRS} )

typedef

1
2
3
4
5
6
7
8
9
10
11
12
13
14
15
typedef Matrix< std::complex<double> , 2 , 2 > Eigen::Matrix2cd
typedef Matrix< std::complex<float> , 2 , 2 > Eigen::Matrix2cf
typedef Matrix< double , 2 , 2 > Eigen::Matrix2d
typedef Matrix< float , 2 , 2 > Eigen::Matrix2f
typedef Matrix< int , 2 , 2 > Eigen::Matrix2i
typedef Matrix< std::complex<double> , 2 , Dynamic> Eigen::Matrix2Xcd
typedef Matrix< std::complex<float> , 2 , Dynamic> Eigen::Matrix2Xcf
typedef Matrix< double , 2 , Dynamic> Eigen::Matrix2Xd
typedef Matrix< float , 2 , Dynamic> Eigen::Matrix2Xf
typedef Matrix< int , 2 , Dynamic> Eigen::Matrix2Xi
typedef Matrix< std::complex<double> , 3 , 3 > Eigen::Matrix3cd
########
transpose 转置
conjugate 共轭
adjoint 伴随

Example

CMakeLists.txt

1
2
3
4
5
6
7
8
9
10
cmake_minimum_required(VERSION 2.8)
project(Test)

find_package(Eigen3 REQUIRED)
MESSAGE( [Main] " EIGEN3_INCLUDE_DIRS = ${EIGEN3_INCLUDE_DIRS}")
# EIGEN3_INCLUDE_DIRS = /usr/include/eigen3

include_directories(${EIGEN3_INCLUDE_DIRS})

add_executable(main test.cpp)

No need to link libraries for eigen3.

c++ code

1
2
3
4
5
6
7
8
9
10
11
12
13
14
15
16
17
18
19
20
21
22
23
24
25
26
27
28
29
30
31
32
33
34
35
36
37
38
39
40
41
42
43
44
45
46
47
48
49
50
51
52
53
54
55
56
57
58
59
60
61
62
63
64
65
66
67
68
69
70
71
72
73
74
75
76
77
78
79
80
81
82
83
84
85
86
87
88
89
90
91
92
93
94
95
96
97
98
99
100
101
102
103
104
105
106
107
108
109
110
111
112
113
114
115
116
117
118
119
120
121
122
123
124
125
126
127
128
129
130
131
132
133
134
135
136
137
138
139
140
141
142
143
144
145
146
147
148
149
150
151
152
153
154
155
156
157
158
159
160
161
162
163
164
165
166
167
168
169
170
171
172
173
174
175
176
177
178
179
180
181
182
183
184
185
186
187
188
189
190
191
192
193
194
195
196
197
198
199
200
201
202
203
204
205
206
207
208
209
210
211
212
213
214
215
216
217
218
219
220
221
222
223
224
225
226
227
228
229
230
231
232
233
234
235
236
237
238
239
240
241
242
243
244
245
246
247
248
249
250
#include <Eigen/Dense>
using namespace Eigen;

void test0()
{
//------------------------
MatrixXd m(2,2);
m(0,0) = 3;
m(1,0) = 2.5;
m(0,1) = -1;
m(1,1) = m(1,0) + m(0,1);
cout << "Here is the matrix m:\n" << m << endl;

VectorXd v(2);
v(0) = 4;
v(1) = v(0) - 1;
cout << "Here is the vector v:\n" << v << endl;

//------------------------
Matrix3f m2;
m2 << 1, 2, 3,
4, 5, 6,
7, 8, 9;
cout << m2 << endl;
}

void test1()
{
// stats
Eigen::Matrix2d mat;
mat << 1, 2,
3, 4;
cout << "Here is mat.sum(): " << mat.sum() << endl;
cout << "Here is mat.prod(): " << mat.prod() << endl;
cout << "Here is mat.mean(): " << mat.mean() << endl;
cout << "Here is mat.minCoeff(): " << mat.minCoeff() << endl; // min value = 1
cout << "Here is mat.maxCoeff(): " << mat.maxCoeff() << endl; // max value = 4
cout << "Here is mat.trace(): " << mat.trace() << endl; //
}

/*
Here is mat.sum(): 10
Here is mat.prod(): 24
Here is mat.mean(): 2.5
Here is mat.minCoeff(): 1
Here is mat.maxCoeff(): 4
Here is mat.trace(): 5
*/

void test2()
{
// l1-norm = |v1|+|v2|+...|vn|
// l2-norm = v1*v1 + v2*v2+...vn*vn squareNorm(), Norm()
// lpNorm< p >(): lpNorm< 1 >() lpNorm< 2 >()

VectorXf v(2);
MatrixXf m(2,2), n(2,2);

v << -1,
2;

m << 1,-2,
-3,4;
cout << "v.squaredNorm() = " << v.squaredNorm() << endl;
cout << "v.norm() = " << v.norm() << endl;
cout << "v.lpNorm<1>() = " << v.lpNorm<1>() << endl;
cout << "v.lpNorm<Infinity>() = " << v.lpNorm<Infinity>() << endl; // max value
cout << endl;
cout << "m.squaredNorm() = " << m.squaredNorm() << endl;
cout << "m.norm() = " << m.norm() << endl;
cout << "m.lpNorm<1>() = " << m.lpNorm<1>() << endl;
cout << "m.lpNorm<Infinity>() = " << m.lpNorm<Infinity>() << endl; // max value


n << 1,-2,
-3,4;
cout << "1-norm(n) = " << n.cwiseAbs().colwise().sum().maxCoeff()
<< " == " << n.colwise().lpNorm<1>().maxCoeff() << endl;
cout << "infty-norm(n) = " << n.cwiseAbs().rowwise().sum().maxCoeff()
<< " == " << n.rowwise().lpNorm<1>().maxCoeff() << endl;
}
/*
v.squaredNorm() = 5
v.norm() = 2.23607
v.lpNorm<1>() = 3
v.lpNorm<Infinity>() = 2

m.squaredNorm() = 30
m.norm() = 5.47723
m.lpNorm<1>() = 10
m.lpNorm<Infinity>() = 4


1-norm(n) = 6 == 6
infty-norm(n) = 7 == 7
*/


void test3()
{
// bool
ArrayXXf a(2,2);

a << 1,2,
3,4;
cout << "(a > 0).all() = " << (a > 0).all() << endl; // bool
cout << "(a > 0).any() = " << (a > 0).any() << endl; // bool
cout << "(a > 0).count() = " << (a > 0).count() << endl; // int
cout << endl;
cout << "(a > 2).all() = " << (a > 2).all() << endl;
cout << "(a > 2).any() = " << (a > 2).any() << endl;
cout << "(a > 2).count() = " << (a > 2).count() << endl;
}
/*
(a > 0).all() = 1
(a > 0).any() = 1
(a > 0).count() = 4

(a > 2).all() = 0
(a > 2).any() = 1
(a > 2).count() = 2
*/

void test4()
{
// get min/max index
Eigen::MatrixXf m(2,2);

m << 1, 2,
3, 4;

//get location of maximum
MatrixXf::Index maxRow, maxCol;
float max = m.maxCoeff(&maxRow, &maxCol);

//get location of minimum
MatrixXf::Index minRow, minCol;
float min = m.minCoeff(&minRow, &minCol);

cout << "Max: " << max << ", at: " << maxRow << "," << maxCol << endl;
cout << "Min: " << min << ", at: " << minRow << "," << minCol << endl;
}
/*
Max: 4, at: 1,1
Min: 1, at: 0,0
*/

void test5()
{
// colwise rowwise
Eigen::MatrixXf mat(2,4);
mat << 1, 2, 6, 9,
3, 1, 7, 2;

std::cout << "Column's maximum: " << std::endl
<< mat.colwise().maxCoeff() << std::endl;

std::cout << "Row's maximum: " << std::endl
<< mat.rowwise().maxCoeff() << std::endl;
}
/*
Column's maximum:
3 2 7 9
Row's maximum:
9
7
*/

void test6()
{
// colwise + max/min
MatrixXf mat(2,4);
mat << 1, 2, 6, 9,
3, 1, 7, 2;

MatrixXf::Index maxIndex;
float maxSum = mat.colwise().sum().maxCoeff(&maxIndex);

std::cout << "Maximum sum at position " << maxIndex << std::endl;
std::cout << "The corresponding vector is: " << std::endl;
std::cout << mat.col( maxIndex ) << std::endl;
std::cout << "And its sum is is: " << maxSum << std::endl;
}
/*
Maximum sum at position 2
The corresponding vector is:
6
7
And its sum is is: 13
*/

void test7()
{
// broadcast with vector
Eigen::MatrixXf mat(2,4);
Eigen::VectorXf v(2);

mat << 1, 2, 6, 9,
3, 1, 7, 2;

v << 0,
1;

//add v to each column of m
mat.colwise() += v;
//mat += v; // ERROR

std::cout << "Broadcasting result: " << std::endl;
std::cout << mat << std::endl;
}
/*
Broadcasting result:
1 2 6 9
4 2 8 3
*/

void test8()
{
Eigen::MatrixXf m(2,4);
Eigen::VectorXf v(2);

m << 1, 23, 6, 9,
3, 11, 7, 2;

v << 2,
3;
MatrixXf::Index index;
// find nearest neighbour
(m.colwise() - v).colwise().squaredNorm().minCoeff(&index);
cout << "Nearest neighbour is column " << index << ":" << endl;
cout << m.col(index) << endl;
}
/*
Nearest neighbour is column 0:
1
3
*/

void test_eigen3()
{
//test0();
//test1();
//test2();
//test3();
//test4();
//test5();
//test6();
//test7();
test8();
}

Reference

History

  • 20190315: created.

Guide

git config

配置user.name user.email

代码提交时,如果不希望使用global的用户,可以为每个项目单独配置用户名和提交邮箱

1
2
3
4
5
6
7
8
9
10
11
12
13
14
15
16
17
18
19
20
21
22
23
24
25
26
27
28
29
#全局
git config --global user.name "username"
git config --global user.email "[email protected]"

#取消全局
git config --global --unset user.name
git config --global --unset user.email

#局部配置
git config user.name "username"
git config user.email "[email protected]"

#取消局部
git config --unset user.name
git config --unset user.email

#查看全局所有配置
git config --global --list

#查看全局user email
git config --global user.name
git config --global user.email

#查看局部所有配置
git config --global --list

#查看局部user email
git config user.name
git config user.email

git basic workflow

1
2
3
4
5
6
7
8
9
10
11
12
13
14
15
16
17
#克隆新仓库
git clone https://github.com/kezunlin/demo.git
git remote -v
git add .
git commit -am "init repo"
git push origin master

#或者提交已有仓库
git init .
git remote rm origin
git remote add origin https://github.com/kezunlin/demo.git
git remote -v
git pull origin master

git add .
git commit -am "init repo"
git push origin master

git branch workflow

1
2
3
4
5
6
7
8
9
10
11
12
13
14
15
16
17
18
19
20
21
22
23
24
25
26
27
28
29
30
31
32
33
34
35
36
37
38
39
40
41
42
43
44
45
46
47
48
49
50
51
#比如,我需要开发一个newfeature分支进行开发,具体流程如下
#1)添加分支
cd demo
git checkout -b newfeature

#2)现在已经从master分支切换到newfeature分支,在newfeature分支添加若干代码和文件
touch main.cpp

#3)提交到本地
git ls-files # check which files are included in git

git add .
git commit -am 'update in newfeature branch'

#4)同步gitlab的最新master分支到本地
git checkout master
git pull origin master

#> 可以看到,同步master分支之后,gitlab上的最新文件和代码会同步到本地的master分支。

#5)合并master分支到自己的newfeature分支
git checkout newfeature
git merge master

output
Already up-to-date!
Merge made by the 'recursive' strategy.

#>可以看到master分支被成功合并进了newfeature分支。
#>合并过程可能会有冲突,根据提示需要先修复冲突文件,然后在本地提交之后,推送到gitlab的newfeature分支。

#5.1) 合并之后没有冲突,对自己的newfeature分支进行再次测试,确保没有问题之后推送到gitlab。
#5.2) 合并之后有冲突,请按照提示逐个修复冲突文件,冲突修复完毕,对自己的newfeature分支进行再次测试,确保没有问题之后推送到gitlab。

git add .
git commit -am 'fix some conflicts'

#6)推送newfeature分支到gitlab
#>现在gitlab上的最新代码已经同步到本地master并且合并进了newfeature分支,并且解决了冲突,通过了测试,现在需要将newfeature分支推送到gitlab

git push -u origin newfeature

#> 推送成功

#7)在gitlab上合并newfeature分支到master
#7.1)打开demo git可以看到新建的分支newfeature,点击merge request
#7.2)发起submit merge request请求
#7.3)进入到merge页面,等待merge请求通过。
#7.4)maintainer通过了merge请求,自己的分支newfeature成功合并到master分支.

#> 如果此处合并失败,请回到(4),(5),(6)步骤重试。

git tag

1
2
3
4
5
6
7
8
9
10
11
12
13
14
15
16
17
18
19
20
21
22
23
24
25
26
27
28
29
30
31
32
33
34
35
36
37
38
39
git tag -a V1.2 -m 'release 1.2'

git tag

git show V1.2

# push local tags to remote
git push origin V1.2
git push origin --tags

# delete local and remote tag
git tag -d V1.2
git push origin :refs/tags/V1.2

# fetch remote tag
git fetch origin tag V1.2
```

### multiple github workflow

#### ssh-keygen
```bash
#为git配置多个用户和key
#账号1
ssh-keygen -t rsa -C "[email protected]"
Generating public/private rsa key pair.
Enter file in which to save the key (/home/kezunlin/.ssh/id_rsa): id_rsa_kezunlin1

#账号2
ssh-keygen -t rsa -C "[email protected]"
Generating public/private rsa key pair.
Enter file in which to save the key (/home/kezunlin/.ssh/id_rsa): id_rsa_kezunlin2


#添加这些key到SSH agent中
ssh-add ~/.ssh/id_rsa_kezunlin1
ssh-add ~/.ssh/id_rsa_kezunlin2

#>因为默认只读取id_rsa

edit config

edit ~/.ssh/config

1
2
3
4
5
6
7
8
9
10
11
12
13
14
15
16
17
18
#配置多个github账号
#默认
Host github.com
User git
Hostname github.com
IdentityFile ~/.ssh/id_rsa

#用户kezunlin1
Host kezunlin1.github.com
User kezunlin1
Hostname github.com
IdentityFile ~/.ssh/id_rsa_kezunlin1

#用户kezunlin2
Host kezunlin2.github.com
User kezunlin2
Hostname github.com
IdentityFile ~/.ssh/id_rsa_kezunlin2

upload public keys

  1. 将id_rsa_kezunlin1.pub添加到kezunlin1的github账号中
  2. 将id_rsa_kezunlin2.pub添加到kezunlin2的github账号中

test ssh

1
2
3
4
5
ssh -T [email protected]
Hi kezunlin! You've successfully authenticated, but GitHub does not provide shell access.

ssh -T [email protected]

clone repo

1
2
3
4
5
6
7
8
9
10
11
#错误方法

git clone [email protected]:kezunlin1/demo.git
git clone [email protected]:kezunlin2/demo.git

Cloning into 'demo'...
ERROR: Repository not found.
fatal: Could not read from remote repository.

Please make sure you have the correct access rights
and the repository exists.

when clone repos we must specify
[email protected]:kezunlin1/demo.git or
[email protected]:kezunlin2/demo.git

1
2
3
#正确方法
git clone [email protected]:kezunlin1/demo.git
git clone [email protected]:kezunlin2/demo.git

Git LFS

Git LFS lets you store files up to 2 GB in size instead of normal 50 MB.

install

download git-lfs-linux-amd64-v2.7.2.tar.gz from git lfs

1
2
3
4
tar -xzvf git-lfs-linux-amd64-v2.7.2.tar.gz
chmod +x install.sh
sudo ./install.sh
#Git LFS initialized.

usage

To get started with Git LFS, the following commands can be used.

  1. Setup Git LFS on your system. You only have to do this once per repository per machine:

    git lfs install

  2. Choose the type of files you want to track, for examples all ISO images, with git lfs track:

    git lfs track “*.iso”

  3. The above stores this information in gitattributes(5) files, so
    that file need to be added to the repository:

    git add .gitattributes

  4. Commit, push and work with the files normally:

    git add file.iso
    git commit -m “Add disk image”
    git push

issue the commands

>git lfs install
Updated git hooks.
Git LFS initialized.

>git lfs track "*.pdf" 
# generate .gitattributes file

>cat .gitattributes
*.pdf filter=lfs diff=lfs merge=lfs -text

>git add .gitattributes

>git add file.pdf
>git commit -m "Add pdf file"
>git push

Reference

History

  • 20190313: created.
  • 20191127: add multiple workflow

Guide

vim-pathogen

1
2
mkdir -p ~/.vim/autoload ~/.vim/bundle
curl -LSso ~/.vim/autoload/pathogen.vim https://tpo.pe/pathogen.vim

vim ~/.vimrc

1
2
3
execute pathogen#infect()
syntax on
filetype plugin indent on

how to auto install vim plugin
download plugin to ~/.vim/bundle, and auto reload by vim-pathogen

1
2
3
4
5
6
7
8
9
cd ~/.vim/bundle
git clone https://github.com/ervandew/supertab.git
git clone https://github.com/plasticboy/vim-markdown.git
```

### pydiction
```bash
cd ~/.vim/bundle
git clone https://github.com/rkulla/pydiction.git

vim ~/.vimrc

1
2
3
filetype plugin on
let g:pydiction_location = '~/.vim/bundle/pydiction/complete-dict'
let g:pydiction_menu_height = 3

Reference

History

  • 20190312: created.

Guide

copy and zip

copy_and_zip.sh

1
2
3
4
5
6
7
8
9
10
11
12
folder_name=v1.2
folder_zip_name=$folder_name.zip
folder_path=dist/$folder_name
echo $folder_path
mkdir -p $folder_path
cp -r model static templates $folder_path
cp db.py util.py demo.py README.md CHANGELOG.md $folder_path
echo "Copying to $folder_path OK"

cd dist
zip -r $folder_zip_name $folder_name
echo "Zip to $folder_zip_name OK"

copy libs to dist

copylib.sh

1
2
3
4
5
6
7
8
9
10
11
12
13
14
15
#!/bin/sh
# usage: ./copylib.sh ./example_opencv

bin=$1
dest="./lib"

if [ ! -d $dest ];then
echo "makedir $dest"
mkdir $dest
fi

libs=$(ldd $bin | awk '{if (match($3,"/")){ printf("%s "),$3 } }')
#echo $libs
cp $libs $dest
echo "Done"

run scripts to copy libs to lib folder.

./copylib.sh ./example_opencv

tree lib
lib
├── libc.so.6
├── libdl.so.2
├── libgcc_s.so.1
├── libjasper.so.1
├── libjbig.so.0
├── libjpeg.so.8
├── liblzma.so.5
├── libm.so.6
├── libopencv_core.so.3.1
├── libopencv_imgcodecs.so.3.1
├── libopencv_imgproc.so.3.1
├── libpng12.so.0
├── libpthread.so.0
├── librt.so.1
├── libstdc++.so.6
├── libtiff.so.5
└── libz.so.1

0 directories, 17 files

linuxdeployqt Makes Linux applications self-contained by copying in the libraries and plugins that the application uses, and optionally generates an AppImage. Can be used for Qt and other applications.

array demo

1
2
3
4
5
6
7
8
9
10
11
12
13
14
15
16
17
18
19
20
21
22
23
24
25
26
27
28
29
30
31
32
33
34
35
36
37
38
39
40
41
42
43
44
45
46
47
48
49
50
51
52
53
54
55
56
57
58
59
60
61
62
63
64
65
66
67
68
69
70
71
72
73
74
75
76
77
78
79
80
81
82
83
84
85
86
87
88
89
90
91
92
93
#!/bin/bash

content=$(sed -n '4p' 1.csv)
echo $content

row=`wc -l < 2.csv`
echo $row

i=0
for id in `cat 2.csv`
do
if [ $id == $content ]
then
echo $id
else
echo 'not equal'
((i=i+1))
fi
done
echo $i

# array
echo '---------------------------------------'
arr=(Hello World)
echo ${arr[0]}
echo ${arr[1]}

arr[0]="xxx"
arr[1]="yyy"
echo ${arr[0]}
echo ${arr[1]}

echo '---------------------------------------'

# array2
array=(one two three four [5]=five)

echo "Array size: ${#array[*]}"

echo "Array items:"
for item in ${array[*]}
do
printf " %s\n" $item
done

echo "Array indexes:"
for index in ${!array[*]}
do
printf " %d\n" $index
done

echo "Array items and indexes:"
for index in ${!array[*]}
do
printf "%4d: %s\n" $index ${array[$index]}
done

echo '---------------------------------------'

# array3
array=("first item" "second item" "third" "item")

echo "Number of items in original array: ${#array[*]}"
for ix in ${!array[*]}
do
printf " %s\n" "${array[$ix]}"
done
echo

# "${arr[*]}" returns all the items as a single word, whereas "${arr[@]}" returns each item as a separate word.

arr=(${array[*]})
echo "After unquoted expansion: ${#arr[*]}"
for ix in ${!arr[*]}
do
printf " %s\n" "${arr[$ix]}"
done
echo

arr=("${array[*]}")
echo "After * quoted expansion: ${#arr[*]}"
for ix in ${!arr[*]}
do
printf " %s\n" "${arr[$ix]}"
done
echo

arr=("${array[@]}")
echo "After @ quoted expansion: ${#arr[*]}"
for ix in ${!arr[*]}
do
printf " %s\n" "${arr[$ix]}"
done

Reference

History

  • 20190308: created.

Guide

ctypes intro

python only support c api.

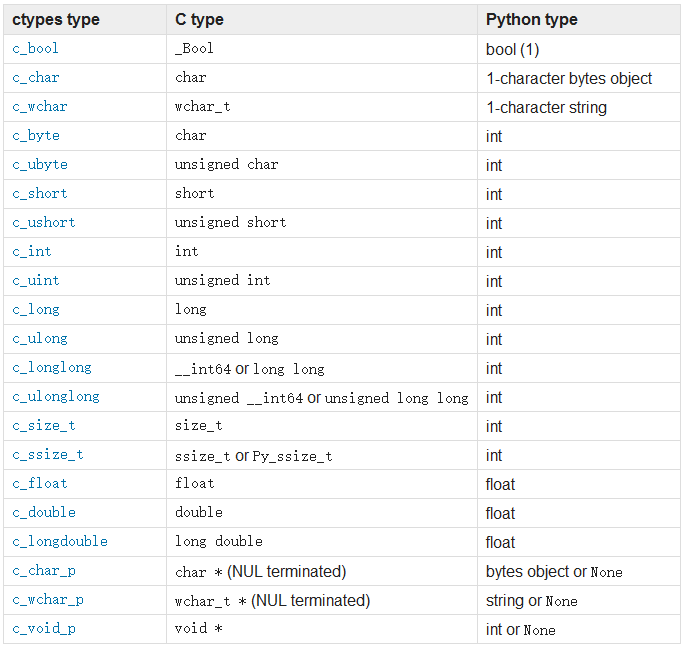
ctypes types, C type, Python type

ctype usage

1
2
3
4
# (1) get and set value for c_int
from ctypes import *
i = c_int(45)
i.value
45
1
2
i.value = 55
i.value
55
1
2
3
# (2) set and get value for c_char_Array_10  (c array)
p = create_string_buffer(10)
p
<ctypes.c_char_Array_10 at 0x7fe008061170>
1
p.raw
'\x00\x00\x00\x00\x00\x00\x00\x00\x00\x00'
1
2
p.value = "Student"
p.raw
'Student\x00\x00\x00'
1
2
p.value = "Big" # set 3 chars "Big" and 4-th char "\0"
p.raw
'Big\x00ent\x00\x00\x00'
1
2
3
4
# (3) get and set value by pointer 
i = c_int(999)
pi = pointer(i) # pointer to c_int
pi.contents
c_int(999)
1
2
pi.contents = c_int(1000)
pi.contents
c_int(1000)
1
2
3
4
5
6
7
8
# (4) use struct
class Point(Structure):
_fields_ = [("x", c_int), ("y", c_int)]
pt = Point(2,5)
print(pt.x, pt.y)

pt2 = Point(y=5) # x default value = 0
print(pt2.x, pt2.y)
(2, 5)
(0, 5)
1
2
3
4
# (5.1) use c array  c_int_Array_10
INT_ARRAY_10 = c_int *10
print(c_int)
print(INT_ARRAY_10)
<class 'ctypes.c_int'>
<class '__main__.c_int_Array_10'>
1
2
3
4
5
6
7
i_array = INT_ARRAY_10() # by default all 0

for i in range(10):
i_array[i] = i

for value in i_array:
print(value)
0
1
2
3
4
5
6
7
8
9
1
2
3
4
# (5.2) use c array  c_char_Array_10
CHAR_ARRAY_10 = c_char * 10
print(c_char)
print(CHAR_ARRAY_10)
<class 'ctypes.c_char'>
<class 'ctypes.c_char_Array_10'>
1
2
3
4
5
6
7
8
9
10
11
12
13
14
15
c_array = CHAR_ARRAY_10() # by default all 0

for i in range(10):
c_array[i] = "a"

for value in c_array:
print(value)

# value and raw field for c_char_Array_10
print(c_array.value)
print(c_array.raw)

c_array.value = "Student"
print(c_array.value)
print(c_array.raw)
a
a
a
a
a
a
a
a
a
a
aaaaaaaaaa
aaaaaaaaaa
Student
Student\00aa
1
2
3
4
5
6
7
8
9
10
11
12
13
14
15
16
17
18
19
# (6) pointer
# byref(x [, offset]) ---> get address of x `&num`
# pointer(x) ---> create a pointer which points to x `int* p = &num;`
# POINTER(type) ---> return a `new type` which points to type instance `Point*`
a = Point(2,5)
b = pointer(a)
print(a)
print(a.x, a.y)

print("\n")
print(b)
print(b.contents) # a
print(b.contents.x, b.contents.y)

c = POINTER(Point)(a)
print("\n")
print(c)
print(c.contents)
print(c.contents.x, c.contents.y)
<__main__.Point object at 0x7fe00805d3b0>
(2, 5)


<__main__.LP_Point object at 0x7fe00805d710>
<__main__.Point object at 0x7fe00805d5f0>
(2, 5)


<__main__.LP_Point object at 0x7fe00805d5f0>
<__main__.Point object at 0x7fe00805d440>
(2, 5)

Example

c++/c code

api.h

1
2
3
4
5
6
7
8
9
10
11
12
13
14
15
16
17
18
19
20
21
22
23
24
25
26
27
28
29
30
31
32
33
34
35
36
37
38
39
40
41
42
43
44
45
46
47
48
49
50
51
52
53
54
55
56
57
58
59
60
61
62
#pragma once
#include "algorithm_shared_export.h"

#include <iostream>

#include <opencv2/opencv.hpp> // Mat

struct SHARED_EXPORT Point
{
float x, y;
};

typedef struct {
int H;
int W;
int C;
float *data;
} image_float_t;

typedef struct {
int H;
int W;
int C;
unsigned char *data;
} image_char_t;

class SHARED_EXPORT MyClass
{
public:
MyClass(int id);
int add(int a, int b);
float addf(float a, float b);
void print_point(Point* p);

private:
int id_;
};


#ifdef __cplusplus
extern "C" {
#endif

// pure C API (can not overload)
SHARED_EXPORT int add(int a, int b);
SHARED_EXPORT float addf(float a, float b);
SHARED_EXPORT void print_point(Point* p);

// warpper for c++ class
SHARED_EXPORT void wrapper_init_class(int id);
SHARED_EXPORT void wrapper_free_class();

SHARED_EXPORT int wrapper_add(int a, int b);
SHARED_EXPORT float wrapper_addf(float a, float b);
SHARED_EXPORT void wrapper_print_point(Point* p);

SHARED_EXPORT void process_image_float(image_float_t im);
SHARED_EXPORT void process_image_char(image_char_t im);

#ifdef __cplusplus
}
#endif

api.cpp

1
2
3
4
5
6
7
8
9
10
11
12
13
14
15
16
17
18
19
20
21
22
23
24
25
26
27
28
29
30
31
32
33
34
35
36
37
38
39
40
41
42
43
44
45
46
47
48
49
50
51
52
53
54
55
56
57
58
59
60
61
62
63
64
65
66
67
68
69
70
71
72
73
74
75
76
77
78
79
80
81
82
83
84
85
86
87
88
89
90
91
92
93
94
95
96
97
98
99
100
101
102
103
104
105
106
107
108
109
110
111
112
113
114
115
116
117
118
119
120
121
122
123
124
125
126
127
128
129
130
131
132
133
134
135
136
137
138
139
140
141
142
143
144
145
146
147
148
149
150
151
152
153
154
155
156
157
158
159
160
161
162
163
164
165
166
#include "api.h"

// c++ class impl

MyClass::MyClass(int id)
:id_(id)
{

}

int MyClass::add(int a, int b)
{
return a + b;
}

float MyClass::addf(float a, float b)
{
return a + b;
}

void MyClass::print_point(Point* p)
{
if (p)
printf("position x %f y %f \n", p->x, p->y);
printf("myclass id = %d \n", id_);
}


#ifdef __cplusplus
extern "C" {
#endif

// pure C API impl
int add(int a, int b)
{
return a + b;
}

float addf(float a, float b)
{
return a + b;
}

void print_point(Point* p)
{
if (p)
printf("position x %f y %f \n", p->x, p->y);
}


// warpper for c++ class
void wrapper_init_class(int id)
{
my = new MyClass(id);
}

void wrapper_free_class()
{
if (my)
{
delete my;
}
}

int wrapper_add(int a, int b)
{
return my->add(a,b);
}

float wrapper_addf(float a, float b)
{
return my->addf(a,b);
}

void wrapper_print_point(Point* p)
{
return my->print_point(p);
}

//(1) bgr, hwc, 0-255 h*W*C+w*C+c int index = h*im.W*im.C + (w*im.C + c);
//(2) bgr, chw, 0-255 c*H*W+h*W+w int index = c*im.H*im.W + (h*im.W + w);

float get_image_pixel_hwc(const image_float_t& im, int h, int w, int c)
{
//(1) bgr, hwc, 0-255 h*W*C+w*C+c int index = h*im.W*im.C + (w*im.C + c);
int index = h*im.W*im.C + (w*im.C + c);
return im.data[index];
}

float get_image_pixel_chw(const image_float_t& im, int h, int w, int c)
{
//(2) bgr, chw, 0-255 c*H*W+h*W+w int index = c*im.H*im.W + (h*im.W + w);
int index = c*im.H*im.W + (h*im.W + w);
return im.data[index];
}

cv::Mat image_float_to_mat(const image_float_t& im)
{
// bgr,hwc, 0-255
cv::Mat mat(im.H, im.W, CV_8UC3);
for(int h=0; h< im.H; ++h)
{
cv::Vec3b *p = mat.ptr<cv::Vec3b>(h);
for(int w=0; w < im.W; ++w)
{
for(int c=0; c< im.C; ++c)
{
// b,g,r
(*p)[c] = (unsigned char)get_image_pixel_hwc(im, h, w, c);
}
p++;
}
}
return mat;
}

// same as image_float_to_mat, but faster
cv::Mat image_float_to_mat2(const image_float_t& im)
{
// bgr,hwc, 0-255
cv::Mat mat(im.H, im.W, CV_8UC3);
const float* p_data = im.data;

for(int h=0; h< im.H; ++h)
{
cv::Vec3b *p = mat.ptr<cv::Vec3b>(h);
for(int w=0; w < im.W; ++w)
{
for(int c=0; c< im.C; ++c)
{
// b,g,r
(*p)[c] = (unsigned char)(*p_data++);
}
p++; // for width
}
}
return mat;
}


cv::Mat image_char_to_mat(const image_char_t& im)
{
// bgr,hwc, 0-255
cv::Mat mat(im.H, im.W, CV_8UC3, im.data);
return mat; // data in python
}

void process_image_float(image_float_t im)
{
cv::Mat mat = image_float_to_mat2(im);

cv::imwrite("result2.jpg", mat);
std::cout<<" saved image to result.jpg"<< std::endl;
}

void process_image_char(image_char_t im)
{
cv::Mat mat = image_char_to_mat(im);

cv::imwrite("result3.jpg", mat);
std::cout<<" saved image to result.jpg"<< std::endl;
}

#ifdef __cplusplus
}
#endif

python

1
2
3
4
5
6
7
8
9
10
11
12
13
14
15
16
17
18
19
20
21
22
23
24
25
26
27
28
29
30
31
32
33
34
35
36
37
38
39
40
41
42
43
44
45
46
47
48
49
50
51
52
53
54
55
56
57
58
59
60
61
62
63
64
65
66
67
68
69
70
71
72
73
74
75
76
77
78
79
80
81
82
83
84
85
86
87
88
89
90
91
92
93
94
95
96
97
98
99
100
101
102
103
104
105
106
107
108
109
110
111
112
113
114
115
116
117
118
119
120
121
122
123
124
125
126
127
128
129
130
131
132
133
134
135
136
137
138
139
140
141
142
143
144
145
146
147
148
149
150
151
152
153
154
155
156
157
158
159
160
161
162
163
164
165
166
167
168
169
170
171
172
173
174
175
176
177
178
179
180
181
182
183
184
from ctypes import *

import cv2
import numpy as np


#==================================================
# os.name "posix" for linux, "nt" for windows
lib = CDLL("./libcapi.so", RTLD_GLOBAL)
#==================================================

"""
// struct
struct Point{
float x, y;
};

// pure C API
SHARED_EXPORT int add(int a, int b);
SHARED_EXPORT float addf(float a, float b);
SHARED_EXPORT void print_point(Point* p);

// warpper for c++ class
SHARED_EXPORT void wrapper_init_class(int id);
SHARED_EXPORT void wrapper_free_class();

SHARED_EXPORT int wrapper_add(int a, int b);
SHARED_EXPORT float wrapper_addf(float a, float b);
SHARED_EXPORT void wrapper_print_point(Point* p);
"""

# struct
class POINT(Structure):
_fields_ = [("x", c_float),
("y", c_float)]


# pure C API
lib.add.argtypes = [c_int, c_int]
lib.add.restype = c_int

lib.addf.argtypes = [c_float, c_float]
lib.addf.restype = c_float

lib.print_point.argtypes = [POINTER(POINT)]
lib.print_point.restype = None

# warpper for c++ class
lib.wrapper_init_class.argtypes = [c_int]
lib.wrapper_init_class.restype = None

lib.wrapper_free_class.argtypes = None
lib.wrapper_free_class.restype = None

lib.wrapper_add.argtypes = [c_int, c_int]
lib.wrapper_add.restype = c_int

lib.wrapper_addf.argtypes = [c_float, c_float]
lib.wrapper_addf.restype = c_float

lib.wrapper_print_point.argtypes = [POINTER(POINT)]
lib.wrapper_print_point.restype = None


def test_capi():
print("test_capi")
print(lib.add(3,5)) # 8
print(lib.addf(3.3,5.5)) # 8.8

p = POINT(9.1,9.2)
print(p) # POINT
print(p.x, p.y) # 9.1,9.2
lib.print_point(byref(p)) # faster
lib.print_point(pointer(p))

def test_wrapper_capi():
print("test_wrapper_capi")

# init class wrapper
lib.wrapper_init_class(100)

print(lib.wrapper_add(3,5)) # 8
print(lib.wrapper_addf(3.3,5.5)) # 8.8

p = POINT(9.1,9.2)
print(p) # POINT
print(p.x, p.y) # 9.1,9.2
lib.wrapper_print_point(byref(p)) # faster
lib.wrapper_print_point(pointer(p))

# free class wrapper
lib.wrapper_free_class()


#======================================

# unsigned char* ===> c_ubyte ===> np.uint8
# float* ===> c_float ===> np.float32
class IMAGE_FLOAT(Structure):
_fields_ = [("h", c_int),
("w", c_int),
("c", c_int),
("data", POINTER(c_float))]

class IMAGE_CHAR(Structure):
_fields_ = [("h", c_int),
("w", c_int),
("c", c_int),
("data", POINTER(c_ubyte))]

lib.process_image_float.argtypes = [IMAGE_FLOAT]
lib.process_image_float.restype = None

lib.process_image_char.argtypes = [IMAGE_CHAR]
lib.process_image_char.restype = None


def mat_to_darknet_image_float(bgr):
# BGR,hwc,[0,255] === > RGB,chw,[0,1]
rgb = cv2.cvtColor(bgr, cv2.COLOR_BGR2RGB)
rgb = rgb.transpose(2, 0, 1) # hwc ===> chw
c = rgb.shape[0]
h = rgb.shape[1]
w = rgb.shape[2]
arr = np.ascontiguousarray(rgb.flat, dtype=np.float32) / 255.0 # [0-1]

data = arr.ctypes.data_as(POINTER(c_float))
im = IMAGE_FLOAT(w, h, c, data)
return im, arr # return `arr` to avoid python freeing memory

def mat_to_image_float(bgr):
# BGR,hwc,[0,255]
print(bgr.shape) # height, width ,channel

#bgr = bgr.transpose(2, 0, 1) # hwc ===> chw
#c = bgr.shape[0]
#h = bgr.shape[1]
#w = bgr.shape[2]

(h,w,c) = bgr.shape

#factor = 1.0
arr = np.ascontiguousarray(bgr.flat, dtype=np.float32)

data = arr.ctypes.data_as(POINTER(c_float))
im = IMAGE_FLOAT(h, w, c, data) # bgr,hwc,0-255
return im, arr # return `arr` to avoid python freeing memory

def mat_to_image_char(bgr):
# BGR,hwc,[0,255]
print(bgr.shape) # height, width ,channel

(h,w,c) = bgr.shape
arr = np.ascontiguousarray(bgr.flat, dtype=np.uint8)

data = arr.ctypes.data_as(POINTER(c_ubyte))
im = IMAGE_CHAR(h, w, c, data) # bgr,hwc,0-255
return im, arr # return `arr` to avoid python freeing memory

def test_process_image_float():
image_filepath = "dog.jpg"
bgr = cv2.imread(image_filepath)
im, arr = mat_to_image_float(bgr)
# image memory allocated in Python with `arr`, `im` only point to `arr`
# so there is no need to free_image(im), because python will free `arr` automatically
lib.process_image_float(im)

def test_process_image_char():
image_filepath = "dog.jpg"
bgr = cv2.imread(image_filepath)
im, arr = mat_to_image_char(bgr)
# image memory allocated in Python with `arr`, `im` only point to `arr`
# so there is no need to free_image(im), because python will free `arr` automatically
lib.process_image_char(im)


def main():
#test_capi()
#test_wrapper_capi()
test_process_image_float()
test_process_image_char()

if __name__ == "__main__":
main()

Python OpenCV Mat to CAPI

C

api.h

1
2
3
4
5
6
7
8
9
10
11
12
13
14
15
16
17
18
19
#pragma once

typedef struct {
int H;
int W;
int C;
unsigned char *data;
} image_char_t;


#ifdef __cplusplus
extern "C" {
#endif

SHARED_EXPORT void process_image_char(image_char_t im);

#ifdef __cplusplus
}
#endif

api.cpp

1
2
3
4
5
6
7
8
9
10
11
12
13
14
15
16
17
18
19
20
21
22
#include "api.h"

#include <opencv2/opencv.hpp> // Mat
#include <opencv2/imgproc.hpp> // cvtColor
#include <opencv2/highgui.hpp> // imdecode imshow


#ifdef __cplusplus
extern "C" {
#endif

void process_image_char(image_char_t im)
{
cv::Mat mat(im.H, im.W, CV_8UC3, im.data);

cv::imwrite("result.jpg", mat);
std::cout<<" saved image to result.jpg"<< std::endl;
}

#ifdef __cplusplus
}
#endif

python

1
2
3
4
5
6
7
8
9
10
11
12
13
14
15
16
17
18
19
20
21
22
23
24
25
26
27
28
29
30
31
32
33
34
35
36
37
38
39
40
41
42
43
44
45
46
47
48
from ctypes import *

import cv2
import numpy as np


#==================================================
# os.name "posix" for linux, "nt" for windows
lib = CDLL("./libcapi.so", RTLD_GLOBAL)
#==================================================


# unsigned char* ===> c_ubyte ===> np.uint8
class IMAGE_CHAR(Structure):
_fields_ = [("h", c_int),
("w", c_int),
("c", c_int),
("data", POINTER(c_ubyte))]

lib.process_image_char.argtypes = [IMAGE_CHAR]
lib.process_image_char.restype = None


def mat_to_image_char(bgr):
# BGR,hwc,[0,255]
print(bgr.shape) # height, width ,channel

(h,w,c) = bgr.shape
arr = np.ascontiguousarray(bgr.flat, dtype=np.uint8)

data = arr.ctypes.data_as(POINTER(c_ubyte))
im = IMAGE_CHAR(h, w, c, data) # bgr,hwc,0-255
return im, arr # return `arr` to avoid python freeing memory

def test_process_image_char():
image_filepath = "dog.jpg"
bgr = cv2.imread(image_filepath)
im, arr = mat_to_image_char(bgr)
# image memory allocated in Python with `arr`, `im` only point to `arr`
# so there is no need to free_image(im), because python will free `arr` automatically
lib.process_image_char(im)


def main():
test_process_image_char()

if __name__ == "__main__":
main()

Boost-python extension

Reference

History

  • 20190308: created.

Guide

python

1
2
3
4
5
6
7
8
9
10
11
12
13
import numpy as np
import cv2
from array import array

table = np.float32(np.zeros((4, 5, 2)))

array_0 = np.array([-1.5,-1.5,-1.5,-1.5, -1.5])
table[:,:,0] = np.array([array_0,array_0,array_0,array_0])

array_1 = np.array([1.1,1.1,1.1,1.1,1.1])
table[:,:,1] = np.array([array_1,array_1,array_1,array_1])

table
array([[[-1.5       ,  1.10000002],
        [-1.5       ,  1.10000002],
        [-1.5       ,  1.10000002],
        [-1.5       ,  1.10000002],
        [-1.5       ,  1.10000002]],

       [[-1.5       ,  1.10000002],
        [-1.5       ,  1.10000002],
        [-1.5       ,  1.10000002],
        [-1.5       ,  1.10000002],
        [-1.5       ,  1.10000002]],

       [[-1.5       ,  1.10000002],
        [-1.5       ,  1.10000002],
        [-1.5       ,  1.10000002],
        [-1.5       ,  1.10000002],
        [-1.5       ,  1.10000002]],

       [[-1.5       ,  1.10000002],
        [-1.5       ,  1.10000002],
        [-1.5       ,  1.10000002],
        [-1.5       ,  1.10000002],
        [-1.5       ,  1.10000002]]], dtype=float32)
1
2
3
4
5
6
7
8
9
10
11
12
13
14
15
16
17
18
19
20
21
22
23
24
25
26
27
28
29
30
31
32
33
# imwrite/imread can only handle 8/16/24/32bit integral data, not floats
# opencv image: hwc, bgr, value range = x: [-5,5], y= [10,45], z = 0; 255 float

def save_table(table, row, col, filename):

table_list = []
for i in range(row):
for j in range(col):
x = table[i][j][0]
y = table[i][j][1]
table_list.append(x)
table_list.append(y)
#print("table_list = ",table_list)

output_file = open(filename, 'wb')
float_array = array('f', table_list) # f,d
float_array.tofile(output_file)
output_file.close()

def load_table(filename, row, col):

input_file = open(filename, 'rb')
float_array = array('f') # f,d
float_array.fromstring(input_file.read())

channel = 2 # default 2
table = np.float32(np.zeros((row, col, 2)))
for i in range(row):
for j in range(col):
table[i][j][0] = float_array[2*(i*col+j) +0]
table[i][j][1] = float_array[2*(i*col+j) +1]

return table
1
2
3
4
5
6
7
8
row = 4  # height
col = 5 # width
# table size
# double: (4*5*2)×8 = 320 bytes
# float: (4*5*2)×4 = 160 bytes
save_table(table, row, col, "table_f.bin")
table2 = load_table("table_f.bin", row, col)
table2
array([[[-1.5       ,  1.10000002],
        [-1.5       ,  1.10000002],
        [-1.5       ,  1.10000002],
        [-1.5       ,  1.10000002],
        [-1.5       ,  1.10000002]],

       [[-1.5       ,  1.10000002],
        [-1.5       ,  1.10000002],
        [-1.5       ,  1.10000002],
        [-1.5       ,  1.10000002],
        [-1.5       ,  1.10000002]],

       [[-1.5       ,  1.10000002],
        [-1.5       ,  1.10000002],
        [-1.5       ,  1.10000002],
        [-1.5       ,  1.10000002],
        [-1.5       ,  1.10000002]],

       [[-1.5       ,  1.10000002],
        [-1.5       ,  1.10000002],
        [-1.5       ,  1.10000002],
        [-1.5       ,  1.10000002],
        [-1.5       ,  1.10000002]]], dtype=float32)

Tips, use d or f to store number as double or float

table size

  • double: (452)×8 = 320 bytes
  • float: (452)×4 = 160 bytes

c++

1
2
3
4
5
6
7
8
9
10
11
12
13
14
15
16
17
18
19
std::string table_filepath = "./table_f.bin";
std::ifstream ifs(table_filepath, std::ifstream::binary);
int rows = 4;
int cols = 5; // xy

for(int y=0; y<rows; ++y)
{
for(int x=0;x<cols;++x)
{
float distance_x;
ifs.read(reinterpret_cast<char*>(&distance_x), sizeof(float));
std::cout<< distance_x << std::endl;

float distance_y;
ifs.read(reinterpret_cast<char*>(&distance_y), sizeof(float));
std::cout<< distance_y << std::endl;
}
}
ifs.close();

Tips: read double

Reference

History

  • 20190228: created.

Guide

  • device: JETSON AGX XAVIER
  • ubuntu 18.04 aarch64
  • cmake: 3.10.2—>3.13.3(手动升级)
  • cmake-gui: 3.10.2
  • nvidia driver:
  • GPU arch(s): sm_72
  • cuda 10.0
  • cudnn 7.3.1
  • glog 0.35 (0.35)
  • gflags 2.2.1 (2.2.1)
  • gtest 1.8 (1.8)
  • boost 1.66 (1.65.1)
  • protobuf(编译为static库) (3.6.1)
  • opencv 3.4.0

升级默认的cmake 3.10.2到最新版3.13.3解决CUDA_cublas_device_LIBRARY问题。
protobuf 3.0.0会导致trainpilot编译出错,所以需要源码编译安装protobuf 3.6.1

jetson products

  • Jetson TX1 (fp32,fp16)
  • Jetson TX2 (fp32,fp16)
  • Jetson AGX Xavier (fp32,fp16,int8,dla)
  • Jetson Nano (Jetbot)

see cuda-gpus

xaiver device

see xaiver
开机: 按下power键(3个按键依次为power,force recovery和reset建),板子后面的一个指示灯亮,发白光。系统启动。

xaiver磁盘只有28G,在编译的过程中可以增加移动硬盘,在移动硬盘上编译opencv,caffe,sdklite,trainpilot等代码,安装到xaiver系统。

check system

  • for desktop ubuntu

    uname -a 
    Linux ke 4.13.0-36-generic #40~16.04.1-Ubuntu SMP Fri Feb 16 23:25:58 UTC 2018 x86_64 x86_64 x86_64 GNU/Linux
    
    uname -p
    x86_64
    
  • for xaiver

    uname -a 
    Linux l4t 4.9.108-tegra #1 SMP PREEMPT Wed Oct 31 15:17:21 PDT 2018 aarch64 aarch64 aarch64 GNU/Linux
    
    uname -p
    aarch64
    

AArch64是ARMv8 架构的一种执行状态。
xaiver默认安装 ubuntu 18.04 版本号为bionic, ubuntu 16.04的版本号为xenial

install packages

1
2
3
4
5
sudo apt-get install build-essential
sudo apt-get install libgtk2.0-dev pkg-config libavcodec-dev libavformat-dev libswscale-dev
sudo apt-get install python-dev python-numpy libtbb2 libtbb-dev libjpeg-dev libpng-dev libtiff-dev libjasper-dev libdc1394-22-dev

sudo apt-get install git cmake cmake-gui

cuda

1
2
sudo apt-get install libleveldb-dev liblmdb-dev libsnappy-dev libhdf5-serial-dev 
sudo apt-get install libopenblas-dev liblapack-dev libatlas-base-dev

upgrade cmake

1
2
3
4
5
6
7
sudo apt-get -y purge cmake

wget https://github.com/Kitware/CMake/releases/download/v3.13.3/cmake-3.13.3.tar.gz
cd cmake-3.13.3
./configure
make -j8
sudo make install

aarch64架构默认安装到/usr/local/lib/usr/local/bin/cmake

Compile Package

gflags && glog

1
2
3
4
#wget https://github.com/schuhschuh/gflags/archive/v2.2.1.tar.gz
#wget https://github.com/google/glog/archive/v0.3.5.tar.gz

sudo apt-get install libgflags-dev libgoogle-glog-dev

gflags: 2.2.1; glog: 0.3.5
aarch64架构默认安装到/usr/include/usr/lib/aarch64-linux-gnu/libgflags.so
对应x86_64架构是默认安装到/usr/include/usr/lib/x86_64-linux-gnu/libgflags.so

gtest

1
2
3
4
5
6
7
#wget https://github.com/google/googletest/archive/release-1.8.0.tar.gz

sudo apt-get install libgtest-dev
cd /usr/src/gtest # only source files
mkdir build && cd build
cmake -DBUILD_SHARED_LIBS=ON ..
make -j8 && make install

gtest只是下载了源码1.8.0,需要compile,默认是static
aarch64架构默认安装到/usr/local/include/gtest/usr/local/lib/libgtest.so,/usr/local/lib/libgtest_main.so

boost

1
apt-get install --no-install-recommends libboost-all-dev

1.65.1
aarch64架构默认安装到/usr/include/usr/lib/aarch64-linux-gnu/libboost_date_time.so,/usr/lib/aarch64-linux-gnu/libboost_filesystem.so

protobuf

1
apt-get install libprotobuf-dev protobuf-compiler 

3.0.0
aarch64架构默认安装到/usr/include/usr/lib/aarch64-linux-gnu/libprotobuf.so,/usr/lib/aarch64-linux-gnu/libprotobuf-lite.so
protoc默认安装到/usr/bin/protoc

notice

protobuf 3.0.0会导致trainpilot编译出错,所以需要源码编译安装protobuf 3.6.1

1
2
3
4
5
6
7
8
9
10
wget https://github.com/protocolbuffers/protobuf/releases/download/v3.6.1/protobuf-cpp-3.6.1.tar.gz

tar -xvf protobuf-cpp-3.6.1.tar.gz
cd protobuf-3.6.1
./configure --disable-shared CXXFLAGS="-fPIC"
./configure --disable-static CXXFLAGS="-fPIC"
make -j8

/usr/local/bin/protoc --version
3.6.1

opencv

1
wget https://github.com/opencv/opencv/archive/3.4.0.zip

ssl error

1
2
3
git clone https://github.com/opencv/opencv.git
Cloning into 'opencv'...
fatal: unable to access 'https://github.com/opencv/opencv.git/': server certificate verification failed. CAfile: /etc/ssl/certs/ca-certificates.crt CRLfile: none

solution

1
git config --global http.sslverify false

cmake-gui display error

1
2
3
cmake-gui ..
qt.qpa.screen: QXcbConnection: Could not connect to display
Could not connect to any X display.

solution:

1
export DISPLAY=':0.0'

clock

see here

make: warning: Clock skew detected. Your build may be incomplete

fix

1
2
sudo date -s 1/18/2019

系统时间有问题。

caffe

1
cd caffe && mkdir build && cmake ..

errors

CMake Error: The following variables are used in this project, but they are set to NOTFOUND.
Please set them or make sure they are set and tested correctly in the CMake files:
CUDA_cublas_device_LIBRARY (ADVANCED)
    linked by target "caffe" in directory /home/nvidia/workspace/caffe/src/caffe

CUDA_cublas_device_LIBRARY error

fix

see here

I also got the problem when I compiled caffe with the latest CUDA 10.0, and after upgrading CMake from 3.12.1 to 3.12.2 it’s done @harumo11

Confirmed: I had the same problem (Ubuntu 18.04, CUDA 10.0) and installing CMake 3.12.2 (instead of the distro’s 3.10.2) fixed it.

升级默认的cmake 3.10.2到最新版3.13.3解决CUDA_cublas_device_LIBRARY问题。

1
2
3
4
cmake --version
3.13.3

cmake -DCMAKE_INSTALL_PREFIX=/usr/local/ ..

nvpmodel

TX2 nvpmodel

Jetson TX2 nvpmodel

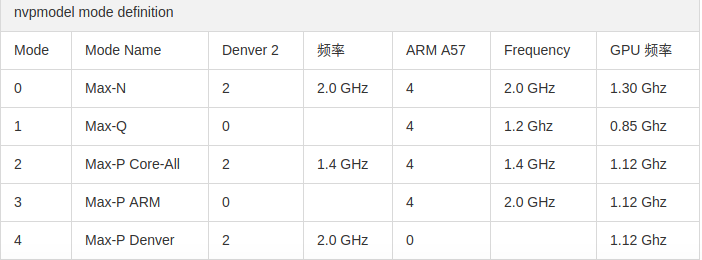
Jetson Tegra系统的应用涵盖越来越广,相应用户对性能和功耗的要求也呈现多样化。为此NVIDIA提供一种新的命令行工具,可以方便地让用户配置CPU状态,以最大限度地提高不同场景下的性能和能耗。

Jetson TX2由一个GPU和一个CPU集群组成。 CPU集群由双核丹佛2处理器和四核ARM Cortex-A57组成,通过高性能互连架构连接。 拥有6个CPU核心和一个GPU,您可以不必自行运行所有性能/功耗来测试最佳的运行状态,因为NVIDIA的新的命令工具Nvpmodel,提供了5种模式。在Jetson TX2上。 下表列出了CPU内核的模式以及正在使用的CPU和GPU的最大频率。

6 cpu mode

1
2
3
4
5
6
7
8
# nvpmodel
# /etc/nvpmodel.conf
cat /proc/cpuinfo

sudo nvpmodel -q –-verbose # 查看当前的模式
sudo nvpmodel -p –-verbose # 打印支持的所有模式及其配置
sudo nvpmodel -m 0 # 启动最高性能,此时所有CPU均已启动,但对应的主频还不是最高的
sudo ~/jetson_clocks.sh # 开启最大频率

jetson_clocks

see here

1
2
3
4
5
6
jetson_clocks.sh --help  
sudo ~/jetson_clocks.sh --show # 查看当前System配置
sudo ~/jetson_clocks.sh # 开启最大频率

# Checking GPU/DLA utilization/stats
sudo ~/tegrastats

Reference

History

  • 20190118: created.

Guide

systems:

  • ubuntu 16.04
  • gnu gcc/g++ 5.4.0
  • cmake
  • cmake-gui
  • opencv 3.1.0

arm toolchain for cross-compiling

  • arm-linux-gnueabi-gcc 5.4.0
  • arm-linux-gnueabi-g++ 5.4.0

check

1
2
3
4
5
6
7
8
9
10
11
which arm-linux-gnueabi-gcc
/usr/bin/arm-linux-gnueabi-gcc

which arm-linux-gnueabi-g++
/usr/bin/arm-linux-gnueabi-g++

which gcc
/usr/bin/gcc

which g++
/usr/bin/g++

compiling

Difference between Native and Cross compiler

  • A native compiler is one that compiles programs for the same architecture or operating system that it is running on. For instance, a compiler running on an x86 processor and creating x86 binaries.
  • A cross-compiler is one that compiles binaries for architectures other than its own, such as compiling ARM binaries on a Intel’s x86 processor.A “cross compiler” executes in one environment and generates code for another. A “native compiler” generates code for its own execution environment.

2 types:

  • native compiling: compile on x86 for x86 binaries, run on x86
  • cross compiliing: compile on x86 for arm binaries, run on arm

install gnu tools

1
sudo apt-get install gcc g++ 

install arm toolchain

apt-get

Toolchains have a loose name convention like [arch] – [vendor] – [os] – [abi]

  • arch is for architecture: arm, mips, x86, i686…
  • vendor is tool chain supplier: apple,
  • os is for operating system: linux, none (bare metal)
  • abi is for application binary interface convention: eabi, gnueabi, gnueabihf

install toolchains

1
sudo apt-get install gcc-arm-linux-gnueabi g++-arm-linux-gnueabi

install 32-bit libraries

1
sudo apt-get install lib32ncurses5 lib32z1

compile like gnu gcc/g++

1
2
arm-linux-gnueabi-gcc -o hello hello.c
arm-linux-gnueabi-g++ -o hello hello.c

hello only run on arm

source

  • arm-linux-gnueabi-4.5.1.tar.bz2

cmake

1
2
cd opencv-3.1.0
mkdir build && cd build && cmake-gui ..

opencv cross compiling

config
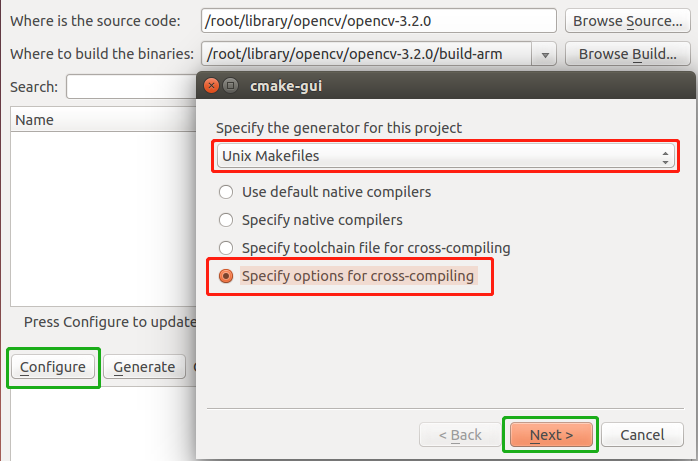
page 1

  • Unix Makefiles
  • Specify options for cross-compiling

page 2

  • operating system: arm-linux
  • c compiler: /usr/bin/arm-linux-gnueabi-gcc
  • c++ compiler:/usr/bin/arm-linux-gnueabi-g++
  • Target ROot: /usr/bin

common cmake options:

CMAKE_INSTALL_PREFIX /usr/local/arm/opencv-arm

Generate and Configure.

1
make -j8

view file

x86-64

file /usr/local/lib/libgtest.so     
/usr/local/lib/libgtest.so: ELF 64-bit LSB shared object, x86-64, version 1 (GNU/Linux), dynamically linked, BuildID[sha1]=3d9e1f42d0584435a3e6aadb11eabfe620a8d52a, not stripped

arm

file libopencv_core.so 
libopencv_core.so: ELF 32-bit LSB shared object, ARM, EABI5 version 1 (GNU/Linux), dynamically linked, BuildID[sha1]=ce2523820bc6a80972c49e465436d8220abf632c, not stripped

install to arm

copy libs and executables to arm

Reference

History

  • 20190119: created.

Series

Guide

intro

如果proto结构体的变量是基础变量,比如int、string等等,那么set的时候直接调用set_xxx即可。
如果变量是自定义类型,那么C++的生成代码中,就没有set_xxx函数名,取而代之的是三个函数名:

  • set_allocated_xxx() 传入参数必须是new出来的指针,protobuf内部会自动释放
  • release_xxx()
  • mutable_xxx()mutable_xxx()函数内部new一个对象并返回对象地址,后续可以赋值

user-defined field

protobuf

1
2
3
4
5
6
7
8
9
10
11
12
13
14
syntax = "proto2";

package kezunlin.proto;

message Vector3D{
optional float x = 1;
optional float y = 2;
optional float z = 3;
}

message PlayerPos{
optional uint32 id = 1;
optional Vector3D pos = 2;
}

demo.pb.h

1
2
3
4
5
6
7
8
9
10
11
12
13
14
15
16
// optional uint32 id = 1;
bool has_id() const;
void clear_id();
static const int kIdFieldNumber = 1;
::google::protobuf::uint32 id() const;
void set_id(::google::protobuf::uint32 value);

// optional .kezunlin.proto.Vector3D pos = 2;
bool has_pos() const;
void clear_pos();
static const int kPosFieldNumber = 2;
public:
const ::kezunlin::proto::Vector3D& pos() const;
::kezunlin::proto::Vector3D* release_pos();
::kezunlin::proto::Vector3D* mutable_pos();
void set_allocated_pos(::kezunlin::proto::Vector3D* pos);

基础类型字段id通过id()set_id()操作;
自定义类型字段pos通过pos(),set_allocated_pos(),release_pos(),mutable_pos()操作;

usage

1
2
3
4
5
6
7
8
9
10
11
12
13
14
15
PlayerPos player;
player.set_id(100);

// method 1
Vector3D *pos = new Vector3D();
pos->x = 1;
pos->y = 2;
pos->z = 3;
player.set_allocated_pos(pos);

// method 2
Vector3D *pos = player.mutable_pos();
pos->x = 1;
pos->y = 2;
pos->z = 3;

总结:对于自定义类型

  • 使用set_allocated_xxx,赋值的对象需要new出来,不能用局部的,这里保存的是对象的指针。
  • 使用mutable_xxx,赋值时候,可以使用局部变量,因为在调用的时,内部做了new操作。

repeated field

protobuf

1
2
3
4
5
6
7
8
9
10
11
12
13
14
15
16
syntax = "proto2";

package kezunlin.proto;

message LidarPoint {
optional double x = 1; // in meters.
optional double y = 2; // in meters.
optional double z = 3; // height in meters.
optional double intensity = 4; // lidar intensity
}

message PointCloud {
optional uint64 timestamp_msec = 1; // Header
repeated LidarPoint points = 2; // lidar point cloud
}

point_cloud.pb.h

1
2
3
4
5
6
7
8
9
10
11
// repeated .kezunlin.proto.LidarPoint points = 2;
int points_size() const;
void clear_points();
static const int kPointsFieldNumber = 2;
::kezunlin::proto::LidarPoint* mutable_points(int index);
::google::protobuf::RepeatedPtrField< ::kezunlin::proto::LidarPoint >*
mutable_points();
const ::kezunlin::proto::LidarPoint& points(int index) const;
::kezunlin::proto::LidarPoint* add_points();
const ::google::protobuf::RepeatedPtrField< ::kezunlin::proto::LidarPoint >&
points() const;

usage

使用add_xxx来新建对象

1
2
3
4
5
6
7
kezunlin::proto::PointCloud pc;

LidarPoint* pt = pc.add_points();
pt->set_x(1);
pt->set_y(2);
pt->set_z(3);
pt->set_intensity(1);

Reference

History

  • 20190117: created.

opendrive

introduction

features

  • xml
  • .xodr

version

  • v0.7 2005
  • v1.1 2007-04-11
  • v1.2 2008-01-06
  • v1.3 2010-08-07
  • v1.4 2015-11-04

viewer

1
2
wget http://www.opendrive.org/tools/odrViewer64.zip
wget http://www.opendrive.org/tools/CulDeSac.xodr

apollo opendrive

The Apollo OpenDrive Format has modified and extended the standard OpenDrive specification, so if necessary, you can email us,or you can leave your email address,we will send the the Apollo OpenDrive specification to you.

Baidu Apollo

intro

  • 去中心化

ROS 在安全性上的一个不足是 ROS 需要有一个节点作为主服务器,用于建立各节点之间的通信连接。这一机制使得ROS节点的容错性增强,各模块的隔离程度增高,但也带来了单点失效(single-point failure)的风险。由于 ROS 本身缺乏针对这种状况的异常恢复机制,当服务器宕机时,整个系统会崩溃。这种情况如果发生在自动驾驶行驶过程中,无疑会造成车毁人忙的后果。针对于此,Apollo 采用了FAST RTPS (real-time Publish/Subscribe)来实现去中心化。

  • 共享内存

ROS节点之间的通信是通过 socket 完成的,在进行数据广播的时候,底层使用的是多个点对点的传送。这种方式速度比较缓慢,且使用了较多的资源。Apollo 使用共享内存的方式对其进行改进,加快了通信速率,减少了CPU损耗。

  • 支持Protobuf

Apollo 将 google 的 Protobuf 与 ROS 深度集成,用于提高数据的版本兼容性。其优势在于当模块接口升级以后,通讯的数据也可以相互兼容。另一个好处是宝贵的自动驾驶的历史数据在模块升级后也可以一直被使用。

modules

1
git clone https://github.com/ApolloAuto/apollo.git

Apollo源码主要是c++实现的,也有少量python,主要程序在apollo/modules目录中

其中每个模块的作用如下:

  • apollo/modules/calibration : 校准模块,使用前必须对系统进行校准和标定,包括激光雷达与摄像头、毫米波雷达与摄像头等。所谓校准就是要对齐激光雷达、摄像头以及毫米波雷达获得的信息,我们知道激光雷达可以获得详细的3D信息,但是不能获得颜色信息,摄像头可以获得颜色信息,但是无法获得深度等3D信息,毫米波雷达不能获得颜色信息,但是可以获得3D信息,三者获得的信息对齐后,就可以同时获得实际环境中的3D信息和颜色信息。

camera+lidar

lidar+radar

  • apollo/modules/canbus:汽车can总线控制模块。接收控制指令,同时给控制模块control发送车身状态信息。
  • apollo/modules/common:公共源码模块。包括如日志,工厂模式的实现,日志系统,监控模块,数学算法等。
  • apollo/modules/control:控制模块。基于决策规划的输出路径及车身的状态使用不同的控制算法来输出控制命令,如转向刹车,控制等。
  • apollo/modules/data:数据模块。收集、存储、处理收集到的各种数据的。
  • apollo/modules/dreamview:可视化模块。查看规划的轨迹及实时的转向刹车油门信息
  • apollo/modules/drivers:驱动模块。各种传感器驱动。
  • apollo/modules/e2e:end to end,端到端强化学习。所谓e2e指的是由传感器的输入,直接决定车的行为,例如油门,刹车,方向等。也就是机器学习的算法直接学习人类司机的驾驶行为。这部分在代码中需要另外下载,学习的数据主要来源于传感器的原始数据,包括图像、激光雷达、雷达等。end-to-end输入以图像为主。 输出是车辆的控制决策指令,如方向盘角度、加速、刹车。 连接输入输出的是深度神经网络,即通过神经网络直接生成车辆控制指令对车辆进行横向控制和纵向控制,中间没有人工参与的逻辑程序。横向控制,主要是指通过方向盘控制车身横向移动,即方向盘角度。纵向控制,是指通过油门和刹车控制车身纵向的移动,即加速、刹车等。横向模型的输出没有采用方向盘角度,而是使用要行驶的曲率(即拐弯半径的倒数)。
  • apollo/modules/elo:利用高精地图的自定位模块。这部分的代码也是另外下载。前向的摄像头会采集车道数据以实现更精确的定位,输出的位置信息包括车辆的x y z坐标,还有就是在百度高精度地图中的ID。
  • apollo/modules/localization:定位模块。输入GPS和IMU信息输出自车定位信息
  • apollo/modules/map:高精地图模块。输出结构化地图信息,如车道线,十字路口等。
  • apollo/modules/monitor:监控模块。监控硬件状态,同时把状态发给交互界面。
  • apollo/modules/perception:感知模块。输入激光点云,高精地图,变换坐标,输出3D障碍物包括速度大小和方向。
  • apollo/modules/planning:局部决策规划模块。
  • apollo/modules/prediction:预测模块。输出感知的障碍物信息及自定位信息输出障碍物未来的轨迹。
  • apollo/modules/routing:全局规划模块。输入包括地图信息各起点终点地址,输出一个全局的导航信息。
  • apollo/modules/third_party_perception:第三方感知模块。
  • apollo/modules/tools:通用监控与可视化模块。

感知模块也只是使用了激光雷达,没有和camera或者雷达做融合,也没有单独使用到camera和雷达。

AdapterManager

perception

workflow

workflow

在实时系统中一个任务的调度方式通常可大致分为两类:时间驱动(timer-triggered) 和 事件驱动(event-triggered)。

coordinate

lidar calibration

Reference

History

  • 20190109: created.