Series
- Part 1: Using Github Pages and Hexo to manage personal blogs on Ubuntu.
- Part 2: Using Github Pages and Hexo to manage personal blogs on windows.
Hexo Tutorial
Github recommends us to use Jekyll to manage static pages, which is based on Ruby and is difficult for us to install and configure. So we use Hexo instead. Hexo is a static blog framework similar to Jekyll ,which is based on Node.js and easier for use to use.
use Github to create repo
create a new repo in github, name by
username.github.io:kezunlin.github.ioSetting | Github Pages, choose a theame and deploy.
install nodejs by apt-get
1 | sudo apt-get -y install nodejs |
install nodejs from source
1 | # download and compile |
test node
1 | cat hello.js |
install hexo
1 | # install hexo globally |
use cnpm instead of npm (optional)
1 | # cnpm install |
create hexo site
1 | cd workspace |
now we can visit localhost:4000 and create posts.
deploy to github
vim blog/_config.yml
1 | deploy: |
generate ssh-key and copy to github
1 | # generate ssh-key |
ssh-keygen -t rsa -C “your_email@example.com“
now we can visit https://kezunlin.github.io/
add README and skip render
add
README.mdto source folderedit
blog/_config.ymlto skip renderREADME.md1
2skip_render:
- README.mduse
hexo generateto copyREADME.mdfrom source/ to public/
new post and deploy again
1 | hexo new 'first post' |
now we can visit https://kezunlin.github.io/ and see our first post.
Appendix
hexo commands
Hexo common commands:
1 | hexo new "postName" #new post |
Hexo short commands:
1 | hexo n == hexo new |
Hexo composite commands:
1 | hexo server -g |
front-matter
1 | --- |
more
use <!--more--> to control web content
Use next theme
1 | cd blog |
vim blog/_config.yml
1 | #theme: landscape |
Avatar
edit blog\themes\next\_config.yml
1 | avatar: /images/avatar.jpg |
Plugins
install plugin by
1 | npm install <plugin-name> --save |
hexo admin
1 | cnpm install --save hexo-admin |
now we can visit http://localhost:4000/admin/
git deployer
1 | npm install hexo-deployer-git --save |
rss feed
1 | npm install hexo-generator-feed --save |
sitemap
1 | npm install hexo-generator-sitemap --save |
vim blog/_config.yml
1 | sitemap: |
now we can visit http://localhost:4000/sitemap.xml
baidu sitemap
1 | npm install hexo-generator-baidu-sitemap --save |
vim blog/_config.yml
1 | baidusitemap: |
now we can visit http://localhost:4000/baidusitemap.xml
perment link
1 | cnpm install hexo-abbrlink --save |
edit blog\_config.yml
1 | permalink: post/:abbrlink/ |
will fill abbrlink in your post.md
1 | --- |
index/archive/category/tag
1 | npm install hexo-generator-index --save |
tags list page
1 | hexo new page "tags" |
edit source/tags/index.md
1 | --- |
now we can visit http://localhost:4000/tags/
categories list page
1 | hexo new page "categories" |
edit source/categories/index.md
1 | --- |
now we can visit http://localhost:4000/categories/
local search
install search plugin
1 | cnpm install hexo-generator-search --save |
edit themes\next\_config.yml
1 | local_search: |
edit blog\_config.yml
1 | search: |
Upload images to cnblog
- install img-uploader chrome extension by here
- upload image and get url.
- use url in markdown.
1 |  |
Multiple deploy
- deploy to github.com:
username.github.io - deploy to coding.net (gitcaffe):
username
vim blog/_config.yml
1 | deploy: |
Advanced
custom domain and https
- blog: Github pages
- SSL:CloudFlare
- domain: Godaddy (dns nameservers from CloudFlare)
get ips by
1 | dig kezunlin.github.io +noall +answer |
- A: point to 185.199.108/109/110/111.153
- CNAME: point to
kezunlin.me
steps:
- get
kezunlin.mefromGodaddy.com - add
kezunlin.meto github blog’sblog\source\CNAMEfile - register
CloudFlare.comand addArecord with github page IP185.199.108/109/110/111.153
- Go to
Godaddy.comand add dns nameserversdina.ns.cloudflare.comandpaul.ns.cloudflare.comfrom here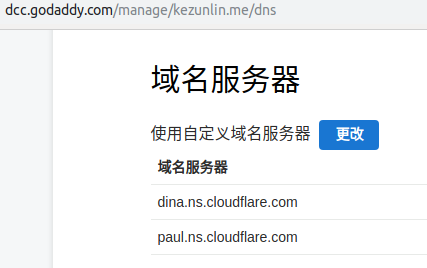
- wait for some hours(24 hours) and we get results from
CloudFlare
1 | kezunlin.me |
Active means nameservers take effect.
configure Page Rules | rules for Always use HTTPS
google analytics
- get
google-site-verificationfrom google search console and add tothemes/next/layout/_partials/head.swig1
<meta name="google-site-verification" content="***" />
- get
google_analyticsand editthemes\next\_config.yml1
google_analytics: UA-***
google adsense
- google-adsense-header.js
- google-adsense-display.js
- google-adsense-article.js
google-adsense-header.js
1 | <script data-ad-client="ca-pub-5653382914441020" async src="https://pagead2.googlesyndication.com/pagead/js/adsbygoogle.js"></script> |
baidu zhanzhang
get baidu-site-verification from https://ziyuan.baidu.com/ and add to themes/next/layout/_partials/head.swig
1 | <meta name="baidu-site-verification" content="***" /> |
360 zhanzhang
get 360-site-verification from http://zhanzhang.so.com/sitetool/ and add to themes/next/layout/_partials/head.swig
1 | <meta name="360-site-verification" content="***" /> |
nofollow
1 | cnpm install hexo-filter-nofollow --save |
edit blog\_config.yml
1 | nofollow: |
code highlight
1 | cnpm install --save hexo-prism-plugin |
edit blog\_config.yml
1 | highlight: |
permalink-pinyin
1 | cnpm i hexo-permalink-pinyin --save |
edit blog\_config.yml
1 | permalink_pinyin: |
only for post url with chinese words
recommend posts
install plugin
1 | npm install hexo-recommended-posts --save |
edit blog\_config.yml
1 | recommended_posts: |
related posts
1 | npm install hexo-related-popular-posts --save |
see here
pin top post
1 | cnpm install hexo-generator-index-pin-top --save |
and edit _posts/your-post.md
1 | --- |
see here
404
hexo new page "404"- edit
blog\source\404\index.md hexo generateto generateblog\public\404.htmlhexo deployto deploy blog to github.- now we can access
https://kezunlin.me/404.html
when 404 error occur, github will serve
https://kezunlin.me/404.htmlas result.
stats busuanzi
edit /theme/next/layout/_third-party/analytics/busuanzi-counter.swig
replace
1 | <script async src="https://dn-lbstatics.qbox.me/busuanzi/2.3/busuanzi.pure.mini.js"></script> |
with
1 | <script async src="https://busuanzi.ibruce.info/busuanzi/2.3/busuanzi.pure.mini.js"></script> |
edit blog\themes\next\_config.yml
1 | busuanzi_count: |
gitment for comment (not)
We can use github repo to store blog site’s comments in issues
register OAuth Application
- visit https://github.com/settings/applications/new
- fill in blanks, callback URL:
https://kezunlin.me - get
client IDandclient secret
go to https://github.com/settings/developers to check your OAuth Apps
gitment config
- create a new repo named
gitmentin Github for storing comments in issues - edit
blog\themes\next\_config.yml
1 | gitment: |
Notice
- github_user: kezunlin
- github_repo: gitment
init page comment
hexo deployto deploy blogs- visit page and click button
Initialize Comment - post your first comment.
error fix: https://github.com/imsun/gitment/issues/188
gitalk for comment
valine
skip now.
copy code (not)
see hexo-copy
see hexo copy 2
customize hexo
shareJS
see here
optimize for speed
multiple deploy
deploy to coding.net.
hexo-neat
1 | cnpm install hexo-neat --save |
edit blog\_config.yml
1 | # hexo-neat |
hexo-all-minifier (not)
1 | npm install hexo-all-minifier --save |
edit blog\_config.yml
1 | all_minifier: true |
Tips: not enable minifier currently because not stable.
hexo-filter-optimize (not)
1 | cnpm install hexo-filter-optimize |
and edit blog\theme\next\_config.yml
1 | filter_optimize: |
Lazy load
cdn
skip
multi language
sel tools
very good ref here
get alexa rank
access alexa rank for kezunlin.me
output
1 | <!-- |
kezunlin.mealexa rank is 4070983.
image resource
Errors
hexo Error watch ENOSPC
1 | > hexo server |
solution:
1 | echo fs.inotify.max_user_watches=524288 | sudo tee -a /etc/sysctl.conf && sudo sysctl -p |
ERROR Local hexo not found in
1 | hexo -v |
solution:
1 | cd blog |
cache
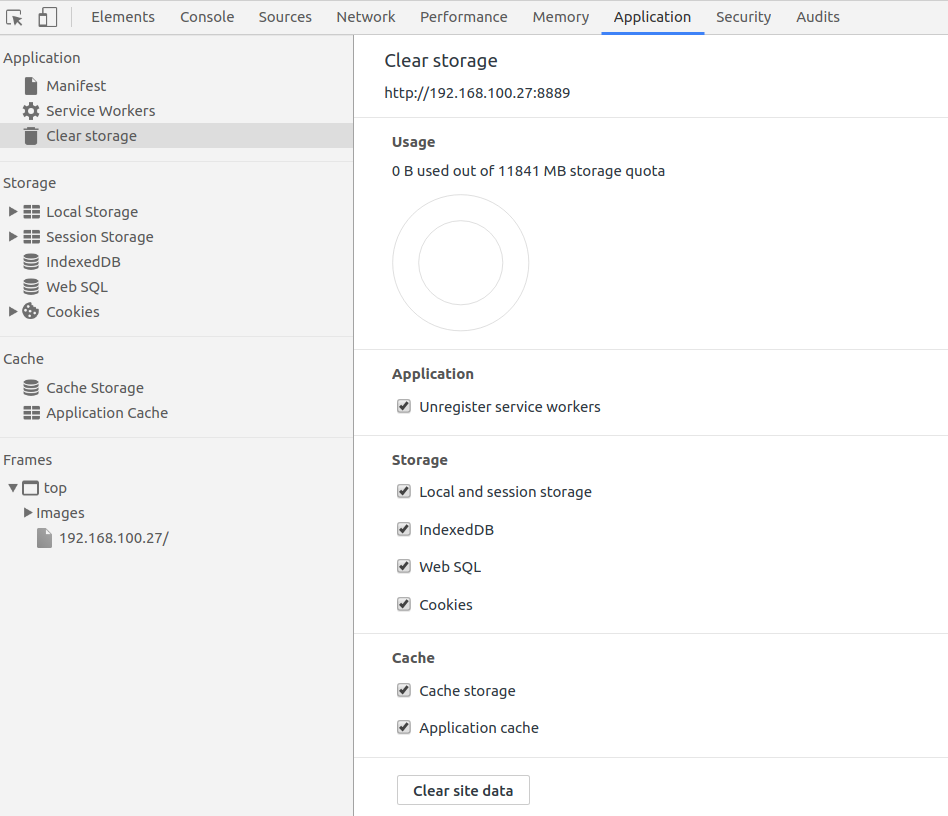
google chrome force reload page without cache
steps
F12->Application->Clear Storage->Clear site data
Reference
- error watch ENOSPC
- third party services
- gitment
- hexo image manage
- hexo prement link
- using cnblogs and chrome extension to upload iamges
- img uploader
- baidushare support https
- hexo minifier
- hexo neat
- domain dnspod godaddy
- use https
- optimize for speed
- github page IP
- google adsense demo site
- google adsense for hexo blog
- leafjame google adsense
- hexo-recommended-posts
- hexo-theme-next hexo-recommended-posts
- hexo comment systems
- gitalk
- gitalk for hexo next
- gitalk for hexo next 2
- gitalk for hexo next 3
History
- 2017/12/26: created.
- 2017/12/27: add Appendix,use next theame,add tags/categories page.
- 2017/12/28: add Advanced, use gitment,baidushare,local search,etc.
- 2018/01/02: upload images to cnblogs.
- 2018/01/03: hexo-neat to compress,cdn,etc.
- 2018/01/22: add part2.
- 2018/09/05: add ssl.
- 2019/11/07: reorganize post contents.