Guide
- device: JETSON AGX XAVIER
- ubuntu 18.04 aarch64
- cmake: 3.10.2—>3.13.3(手动升级)
- cmake-gui: 3.10.2
- nvidia driver:
- GPU arch(s): sm_72
- cuda 10.0
- cudnn 7.3.1
- glog 0.35 (0.35)
- gflags 2.2.1 (2.2.1)
- gtest 1.8 (1.8)
- boost 1.66 (1.65.1)
- protobuf(编译为static库) (3.6.1)
- opencv 3.4.0
升级默认的
cmake 3.10.2到最新版3.13.3解决CUDA_cublas_device_LIBRARY问题。protobuf 3.0.0会导致trainpilot编译出错,所以需要源码编译安装protobuf 3.6.1。
jetson products
- Jetson TX1 (fp32,fp16)
- Jetson TX2 (fp32,fp16)
- Jetson AGX Xavier (fp32,fp16,int8,dla)
- Jetson Nano (Jetbot)
see cuda-gpus
xaiver device
see xaiver
开机: 按下power键(3个按键依次为power,force recovery和reset建),板子后面的一个指示灯亮,发白光。系统启动。
xaiver磁盘只有28G,在编译的过程中可以增加移动硬盘,在移动硬盘上编译opencv,caffe,sdklite,trainpilot等代码,安装到xaiver系统。
check system
for desktop ubuntu
uname -a
Linux ke 4.13.0-36-generic #40~16.04.1-Ubuntu SMP Fri Feb 16 23:25:58 UTC 2018 x86_64 x86_64 x86_64 GNU/Linux

uname -p
x86_64
for xaiver
uname -a
Linux l4t 4.9.108-tegra #1 SMP PREEMPT Wed Oct 31 15:17:21 PDT 2018 aarch64 aarch64 aarch64 GNU/Linux

uname -p
aarch64
AArch64是ARMv8 架构的一种执行状态。
xaiver默认安装 ubuntu 18.04 版本号为bionic, ubuntu 16.04的版本号为xenial
install packages
sudo apt-get install build-essential
sudo apt-get install libgtk2.0-dev pkg-config libavcodec-dev libavformat-dev libswscale-dev
sudo apt-get install python-dev python-numpy libtbb2 libtbb-dev libjpeg-dev libpng-dev libtiff-dev libjasper-dev libdc1394-22-dev

sudo apt-get install git cmake cmake-gui
cuda
sudo apt-get install libleveldb-dev liblmdb-dev libsnappy-dev libhdf5-serial-dev
sudo apt-get install libopenblas-dev liblapack-dev libatlas-base-dev
upgrade cmake
sudo apt-get -y purge cmake

wget https://github.com/Kitware/CMake/releases/download/v3.13.3/cmake-3.13.3.tar.gz
cd cmake-3.13.3
./configure
make -j8
sudo make install
aarch64架构默认安装到/usr/local/lib和/usr/local/bin/cmake
Compile Package
gflags && glog
#wget https://github.com/schuhschuh/gflags/archive/v2.2.1.tar.gz
#wget https://github.com/google/glog/archive/v0.3.5.tar.gz

sudo apt-get install libgflags-dev libgoogle-glog-dev
gflags: 2.2.1; glog: 0.3.5
aarch64架构默认安装到/usr/include和/usr/lib/aarch64-linux-gnu/libgflags.so
对应x86_64架构是默认安装到/usr/include和/usr/lib/x86_64-linux-gnu/libgflags.so
gtest
#wget https://github.com/google/googletest/archive/release-1.8.0.tar.gz

sudo apt-get install libgtest-dev
cd /usr/src/gtest # only source files
mkdir build && cd build
cmake -DBUILD_SHARED_LIBS=ON ..
make -j8 && make install
gtest只是下载了源码1.8.0,需要compile,默认是static
aarch64架构默认安装到/usr/local/include/gtest和/usr/local/lib/libgtest.so,/usr/local/lib/libgtest_main.so
boost
apt-get install --no-install-recommends libboost-all-dev
1.65.1
aarch64架构默认安装到/usr/include和/usr/lib/aarch64-linux-gnu/libboost_date_time.so,/usr/lib/aarch64-linux-gnu/libboost_filesystem.so
protobuf
apt-get install libprotobuf-dev protobuf-compiler
3.0.0
aarch64架构默认安装到/usr/include和/usr/lib/aarch64-linux-gnu/libprotobuf.so,/usr/lib/aarch64-linux-gnu/libprotobuf-lite.soprotoc默认安装到/usr/bin/protoc
notice
protobuf 3.0.0会导致trainpilot编译出错,所以需要源码编译安装protobuf 3.6.1。
wget https://github.com/protocolbuffers/protobuf/releases/download/v3.6.1/protobuf-cpp-3.6.1.tar.gz

tar -xvf protobuf-cpp-3.6.1.tar.gz
cd protobuf-3.6.1
./configure --disable-shared CXXFLAGS="-fPIC"
./configure --disable-static CXXFLAGS="-fPIC"
make -j8

/usr/local/bin/protoc --version
3.6.1
opencv
wget https://github.com/opencv/opencv/archive/3.4.0.zip
ssl error
git clone https://github.com/opencv/opencv.git
Cloning into 'opencv'...
fatal: unable to access 'https://github.com/opencv/opencv.git/': server certificate verification failed. CAfile: /etc/ssl/certs/ca-certificates.crt CRLfile: none
solution
git config --global http.sslverify false
cmake-gui display error
cmake-gui ..
qt.qpa.screen: QXcbConnection: Could not connect to display
Could not connect to any X display.
solution:
export DISPLAY=':0.0'
clock
see here
make: warning: Clock skew detected. Your build may be incomplete
fix
sudo date -s 1/18/2019
sudo date -s 1/18/2019
系统时间有问题。
caffe
cd caffe && mkdir build && cmake ..
errors
CMake Error: The following variables are used in this project, but they are set to NOTFOUND.
Please set them or make sure they are set and tested correctly in the CMake files:
CUDA_cublas_device_LIBRARY (ADVANCED)
    linked by target "caffe" in directory /home/nvidia/workspace/caffe/src/caffe
CUDA_cublas_device_LIBRARYerror
fix
see here
I also got the problem when I compiled caffe with the latest CUDA 10.0, and after upgrading CMake from 3.12.1 to 3.12.2 it’s done @harumo11
Confirmed: I had the same problem (Ubuntu 18.04, CUDA 10.0) and installing CMake 3.12.2 (instead of the distro’s 3.10.2) fixed it.
升级默认的
cmake 3.10.2到最新版3.13.3解决CUDA_cublas_device_LIBRARY问题。
cmake --version
3.13.3

cmake -DCMAKE_INSTALL_PREFIX=/usr/local/ ..
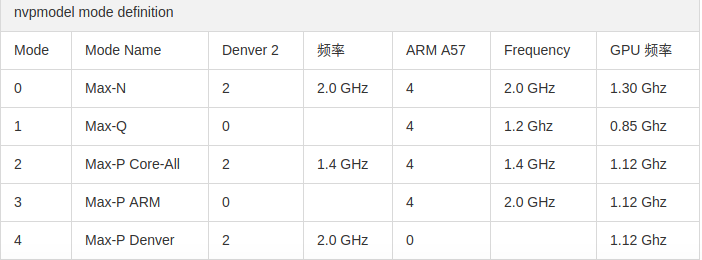
nvpmodel
TX2 nvpmodel
Jetson Tegra系统的应用涵盖越来越广,相应用户对性能和功耗的要求也呈现多样化。为此NVIDIA提供一种新的命令行工具,可以方便地让用户配置CPU状态,以最大限度地提高不同场景下的性能和能耗。
Jetson TX2由一个GPU和一个CPU集群组成。 CPU集群由双核丹佛2处理器和四核ARM Cortex-A57组成,通过高性能互连架构连接。 拥有6个CPU核心和一个GPU,您可以不必自行运行所有性能/功耗来测试最佳的运行状态,因为NVIDIA的新的命令工具Nvpmodel,提供了5种模式。在Jetson TX2上。 下表列出了CPU内核的模式以及正在使用的CPU和GPU的最大频率。
# nvpmodel
# /etc/nvpmodel.conf
cat /proc/cpuinfo

sudo nvpmodel -q –-verbose # 查看当前的模式
sudo nvpmodel -p –-verbose # 打印支持的所有模式及其配置
sudo nvpmodel -m 0 # 启动最高性能,此时所有CPU均已启动,但对应的主频还不是最高的
sudo ~/jetson_clocks.sh # 开启最大频率
jetson_clocks
see here
jetson_clocks.sh --help
sudo ~/jetson_clocks.sh --show # 查看当前System配置
sudo ~/jetson_clocks.sh # 开启最大频率

# Checking GPU/DLA utilization/stats
sudo ~/tegrastats
Reference
History
- 20190118: created.